

Description
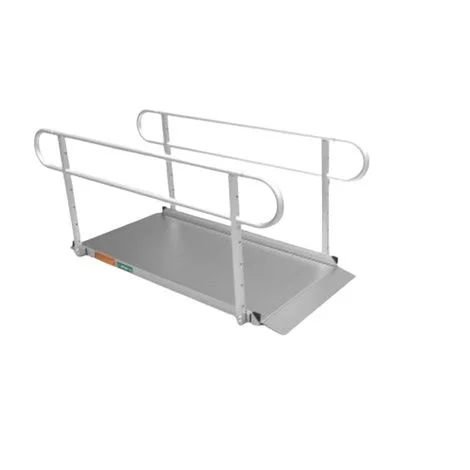
EZ-ACCESS GATEWAY 3G Solid Surface Ramps is a solid surface portable wheelchair ramp. It features a seamless, slip-resistant surface. These Portable Ramps are available with or without handrails, which is an ideal solution for mobility needs, beyond the scope of a conventional portable ramp. Perfect for temporary or semi-permanent home access, the GATEWAY 3G can be easily moved or relocated as needs change. Designed for the rigors of repeated, everyday use in all weather conditions and is ideal for scooters, wheelchairs, and walkers.
Why Choose GATEWAY 3G Solid Surface Ramps?
- Lightweight, Heavy-duty Aluminium
- Quick and Easy Setup
- Self-adjusting Ground Transition Plate
- Made in the USA
EZ-ACCESS GATEWAY 3G Solid Surface Portable Ramp Features
- A safe ramp solution designed to provide home access
- Available with or without handrails
- Can be used for semi-permanent applications and can easily be moved or relocated as needs change
- With lengths up to 10ft, the GATEWAY 3G can accommodate a series of entryway steps
- Features a formed top transition for secure placement, and an adjustable bottom transition that allows smooth ramp-to-ground conversion
- Designed for the rigors of repeated, everyday use in all outdoor weather conditions but can also be used indoors
- Durable construction for years of maintenance-free use
- Will, not rust, rot or deteriorate
- The solid, seam-free surface features permanent (extruded) tread for slip resistance and superb traction
- Raised side rails, also known as curbs, help to prevent mobility devices from driving off the edge of the ramp
- Made of lightweight, heavy-duty aluminum and features a 1,000 lb. weight capacity
- Available in 3, 4, 5, 6, 7, 8, 9, & 10-foot lengths with a standard width of 36 inches
User Manuals
- GATEWAY 3G Solid Surface Portable Ramp Technical Specifications
- GATEWAY 3G Ramp Instructions
- GATEWAY 3G Portable Ramp Warranty
- GATEWAY 3G Brochure
How To Determine The Proper Ramp Length?
- Determine the incline that your chair is designed to climb.
- Measure the rise (distance from the top step, porch, van, etc. to the ground).
- Refer to Incline Chart to find the proper ramp length.
- At any incline, use the ramp only with a qualified helper
Note: Refer to your mobility equipment manufacturer for the proper degree of incline/decline and chair direction before attempting ramp use. Never exceed your mobility equipment manufacturer recommendations.
Which type of GATEWAY 3G Solid Surface Ramps to select?
- Ramp Only
– A great option for users who don’t require handrail assistance when making their way up or down the ramp
– The 1-piece design means no assembly or movable parts; just secure the ramp in the desired position, and it is ready to be used - Ramp with Two-line Handrails and Loops
– Two-line handrails with loops offer increased safety and user stability
– Features smooth, continuous top rails – which are welded for extra strength and durability – and a lower second rail offers an additional gripping surface
– Assembly is quick and easy, requiring only minimal tools to attach the handrail posts and loops - Ramp with Vertical Pickets and Loops
– Smooth, continuous top rails with vertical pickets and loops offer an added level of safety, especially for children and pets. Pickets meet the 4-inch sphere rule for spacing
– Picketed insert sections are pre-assembled for quick and secure installation
– Assembly is quick and easy, requiring only minimal tools to attach the handrail posts and loops
More On EZ-ACCESS GATEWAY 3G Solid Surface Ramps
Fastening Ramp To Landing (All Ramps)
- Place the ramp top lip transition plate (identifiable by the two pre-drilled holes) so it extends onto the landing as far as possible. The ramp top lip transition plate must be fully supported by the landing
- If Resting on a wood landing
– Fasten the top lip transition plate by installing one 1/4″ x 1″ long self-drilling, stainless steel wood screw (not supplied) through each hole. - If Resting on a concrete landing
– Use the two pre-drilled holes in the top lip transition plate as a template to mark the positions on the concrete to drill
– Using a 1/4″ masonry bit, drill two holes at the previously marked locations. Drill to a depth specified by the pin drive anchor manufacturer’s instructions
– Align the top lip transition plate over the drilled holes
– Install 1/4″ x 1-1/2″ pin drive concrete anchors (not supplied) into the holes of the upper transition per the pin drive concrete anchor manufacturers instructions - Temporary installation
– Use the two pre-drilled holes in the top lip transition plate as a template to mark the positions and drill two 1/4″ holes at least 1-1/2″ deep.
– After drilling, make sure that the holes are free of any residue and/or debris
– Align drilled holes with holes in the ramp top lip transition plate, and then insert supplied clevis pins through each hole
Installing (Optional) Handrails
- Both handrail styles, two-line, and handrails with vertical pickets come pre-assembled. Regardless of the style, the process of attaching handrails to the ramp is the same
- Turn the ramp section upside down on a flat surface (do this
Reviews
There are no reviews yet.